juc之ConcurrentSkipListMap
跳表
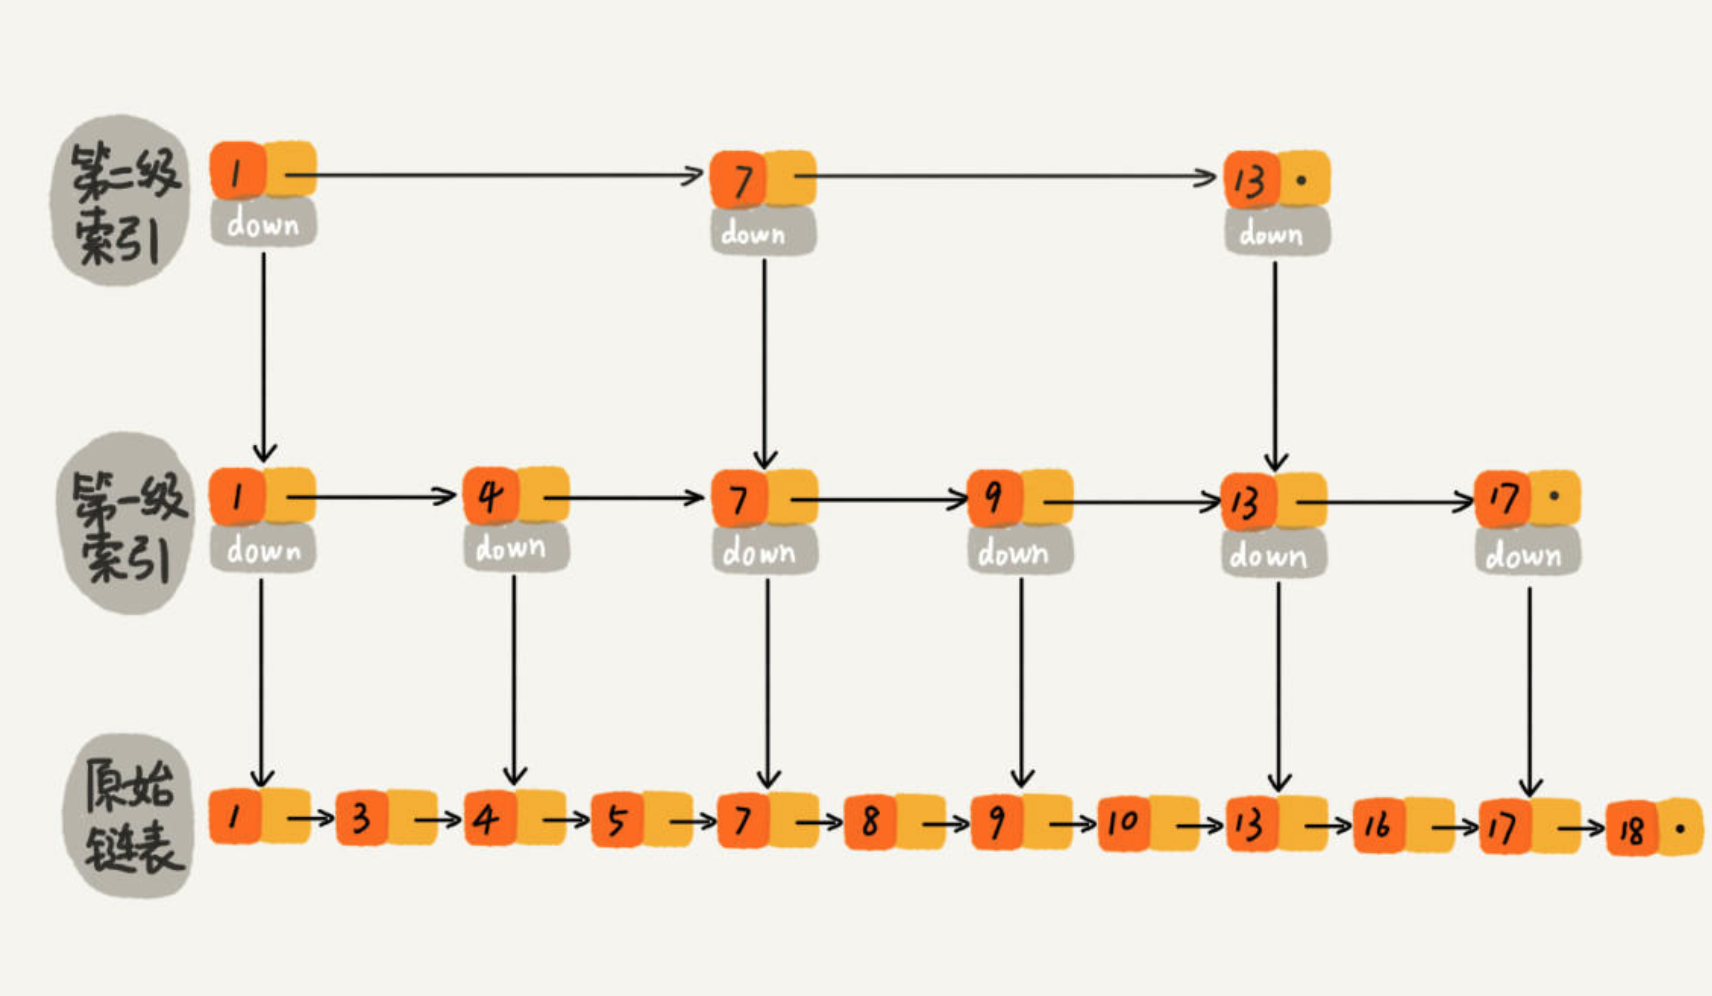
对于一个单链表,即使链表是有序的,如果我们想要在其中查找某个数据,也只能从头到尾遍历链表,这样效率自然就会很低。而跳表是在这个单链表的基础上同时维护了多个链表,并且链表是分层的。

最低层的链表维护了跳表内所有的元素,每上面一层链表都是下面一层的子集。
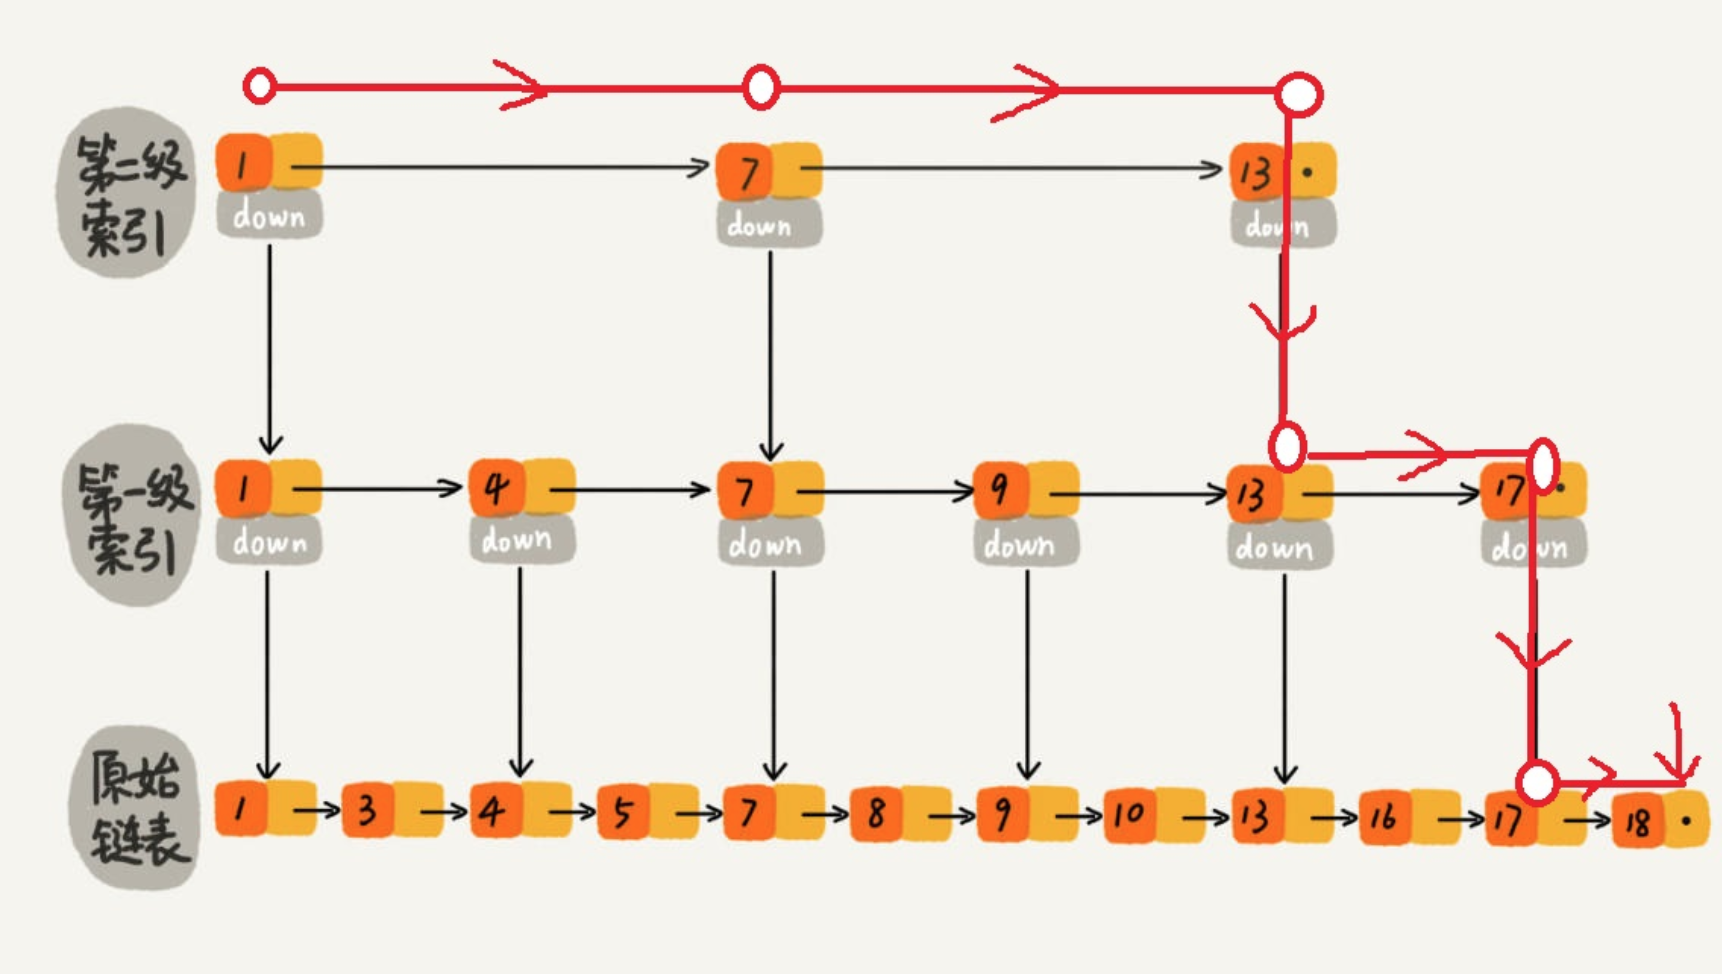
跳表内的所有链表的元素都是排序的。查找时,可以从顶级链表开始找。一旦发现被查找的元素大于当前链表中的取值,就会转入下一层链表继续找。这也就是说在查找过程中,搜索是跳跃式的。如上图所示,在跳表中查找元素 18。

查找 18 的时候原来需要遍历 12 次,现在只需要 7 次即可。针对链表长度比较大的时候,构建索引查找效率的提升就会非常明显。
使用跳表实现 Map 和使用哈希算法实现 Map 的另外一个不同之处是:哈希并不会保存元素的顺序,而跳表内所有的元素都是排序的。因此在对跳表进行遍历时,你会得到一个有序的结果。
在 JDK 的 ConcurrentSkipListMap 实现中,没有使用到锁,而是通过 CAS 来进行数据的修改,当插入数据时,通过 CAS 修改最下层列表的内容,然后再逐层向上维护各级列表(各层列表的修改都是通过 CAS 完成),这两个过程是独立的,因为上层列表维护的数据少也只会影响查找数据的速度,而不会影响到数据的准确性,因为添加与查找数据都以最下层列表内容为准。
ConcurrentSkipListMap的跳表内部实现
内部节点类 Node
static final class Node<K, V>{
    final K key;  // key 是 final 的, 说明节点一旦定下来, 除了删除, 不然不会改动 key 了
    volatile Object value; // 对应的 value
    volatile Node<K, V> next; // 下一个节点

    // 构造函数
    public Node(K key, Object value, Node<K, V> next) {
        this.key = key;
        this.value = value;
        this.next = next;
    }

    /**
     * 创建一个标记节点(通过 this.value = this 来标记)
     * 这个标记节点非常重要: 有了它, 就能对链表中间节点进行同时删除了插入
     * ps: ConcurrentLinkedQueue 只能在头上, 尾端进行插入, 中间进行删除
     */
    public Node(Node<K, V> next) {
        this.key = null;
        this.value = this;
        this.next = next;
    }

    /**
     * CAS 操作设置 Value
     */
    boolean casValue(Object cmp, Object val){
        return unsafe.compareAndSwapObject(this, valueOffset, cmp, val);
    }

    /**
     * CAS 操作设置 next
     */
    boolean casNext(Node<K, V> cmp, Node<K, V> val){
        return unsafe.compareAndSwapObject(this, nextOffset, cmp, val);
    }

    /**
     * 检测是否为标记节点
     */
    boolean isMarker(){
        return value == this;
    }

    /**
     * 检测是否为 链表最左下角的 BASE_HEADER 节点
     */
    boolean isBaseHeader(){
        return value == BASE_HEADER;
    }

    /**
     * 对节点追加一个标记节点, 为最终的删除做准备
     */
    boolean appendMarker(Node<K, V> f){
        return casNext(f, new Node<K, V>(f));
    }

    /**
     * Help out a deletion by appending marker or unlinking from
     * predecessor. This called during traversals when value
     * field seen to be null
     *
     * helpDelete 方法, 这个方法要么追加一个标记节点, 要么进行删除操作
     */
    void helpDelete(Node<K, V> b, Node<K, V> f){
        /**
         * Rechecking links and then doing only one of the
         * help-out stages per call tends to minimize CAS
         * interference among helping threads
         */
        if(f == next && this == b.next){
            if(f == null || f.value != f){ // 还没有对删除的节点进行节点 marker
                casNext(f, new Node<K, V>(f));
            }else{
                b.casNext(this, f.next); // 删除 节点 b 与 f.next 之间的节点
            }
        }
    }

    /**
     * 校验数据
     */
    V getValidValue(){
        Object v = value;
        if(v == this || v == BASE_HEADER){
            return null;
        }
        V vv = (V)v;
        return vv;
    }

    /**
     * Creates and returns a new SimpleImmutableEntry holding current
     * mapping if this node holds a valid value, else null.
     *
     * @return new entry or null
     */
    AbstractMap.SimpleImmutableEntry<K, V> createSnapshot(){
        Object v = value;
        if(v == null || v == this || v == BASE_HEADER){
            return null;
        }
        V vv = (V) v;
        return new AbstractMap.SimpleImmutableEntry<K, V>(key, vv);
    }

    // UNSAFE mechanics
    private static final Unsafe unsafe;
    private static final long valueOffset;
    private static final long nextOffset;

    static {
        try {
            unsafe = UnSafeClass.getInstance();
            Class<?> k = Node.class;
            valueOffset = unsafe.objectFieldOffset(k.getDeclaredField("value"));
            nextOffset = unsafe.objectFieldOffset(k.getDeclaredField("next"));
        }catch (Exception e){
            throw new Error(e);
        }
    }

}
索引节点 Index
static class Index<K, V>{

    final Node<K, V> node; // 索引指向的节点, 纵向上所有索引指向链表最下面的节点
    final Index<K, V> down; // 下边level层的 Index
    volatile Index<K, V> right; // 右边的  Index

    /**
     * Creates index node with given values
     * @param node
     * @param down
     * @param right
     */
    public Index(Node<K, V> node, Index<K, V> down, Index<K, V> right) {
        this.node = node;
        this.down = down;
        this.right = right;
    }

    /**
     * compareAndSet right field
     * @param cmp
     * @param val
     * @return
     */
    final boolean casRight(Index<K, V> cmp, Index<K, V> val){
        return unsafe.compareAndSwapObject(this, rightOffset, cmp, val);
    }

    /**
     * Returns true if the node this indexes has been deleted.
     * @return true if indexed node is known to be deleted
     */
    final boolean indexesDeletedNode(){
        return node.value == null;
    }

    /**
     * Tries to CAS newSucc as successor. To minimize races with
     * unlink that may lose this index node, if the node being
     * indexed is known to be deleted, it doesn't try to link in
     *
     * @param succ the expecteccurrent successor
     * @param newSucc the new successor
     * @return true if successful
     */
    /**
     * 在 index 本身 和 succ 之间插入一个新的节点 newSucc
     * @param succ
     * @param newSucc
     * @return
     */
    final boolean link(Index<K, V> succ, Index<K, V> newSucc){
        Node<K, V> n = node;
        newSucc.right = succ;
        return n.value != null  && casRight(succ, newSucc);
    }

    /**
     * Tries to CAS field to skip over apparent successor
     * succ. Fails (forcing a retravesal by caller) if this node
     * is known to be deleted
     * @param succ the expected current successor
     * @return true if successful
     */
    /**
     * 将当前的节点 index 设置其的 right 为 succ.right 等于删除 succ 节点
     * @param succ
     * @return
     */
    final boolean unlink(Index<K, V> succ){
        return node.value != null && casRight(succ, succ.right);
    }

    // Unsafe mechanics
    private static final Unsafe unsafe;
    private static final long rightOffset;

    static {
        try{
            unsafe = UnSafeClass.getInstance();
            Class<?> k = Index.class;
            rightOffset = unsafe.objectFieldOffset(k.getDeclaredField("right"));
        }catch (Exception e){
            throw new Error(e);
        }
头索引节点 HeadIndex
/**
 * Nodes heading each level keep track of their level.
 */
//  level 属性用来标示索引层级; 注意所有的 HeadIndex 都指向同一个 Base_header 节点;
static final class HeadIndex<K,V> extends Index<K,V> {
    final int level;
    HeadIndex(Node<K,V> node, Index<K,V> down, Index<K,V> right, int level) {
        super(node, down, right);
        this.level = level;
    }
}
ConcurrentSkipListMap的put方法过去冗长和复杂,这里只上一个图解便于理解,就不上代码了,参考 https://www.jianshu.com/p/edc2fd149255
doPut步骤:
整个doPut方法看起来有点吓人, 但没事,我们将这个方法进行分割:
Part I:找到目标节点的位置并插入
- 这里的目标节点是数据节点,也就是最底层的那条链;
- 寻找目标节点之前最近的一个索引对应的数据节点(数据节点都是在最底层的链表上);
- 从这个数据节点开始往后遍历,直到找到目标节点应该插入的位置;
- 如果这个位置有元素,就更新其值(onlyIfAbsent=false);
- 如果这个位置没有元素,就把目标节点插入;
- 至此,目标节点已经插入到最底层的数据节点链表中了;
Part II:随机决定是否需要建立索引及其层次,如果需要则建立自上而下的索引
- 取个随机数rnd,计算(rnd & 0x80000001);
- 如果不等于0,结束插入过程,也就是不需要创建索引,返回;
- 如果等于0,才进入创建索引的过程(只要正偶数才会等于0);
- 计算while (((rnd >>>= 1) & 1) != 0),决定层级数,level从1开始;
- 如果算出来的层级不高于现有最高层级,则直接建立一条竖直的索引链表(只有down有值),并结束Part II;
- 如果算出来的层级高于现有最高层级,则新的层级只能比现有最高层级多1;
- 同样建立一条竖直的索引链表(只有down有值);
- 将头索引也向上增加到相应的高度,结束Part II;
- 也就是说,如果层级不超过现有高度,只建立一条索引链,否则还要额外增加头索引链的高度(脑补一下,后面举例说明);
Part III:将新建的索引节点(包含头索引节点)与其它索引节点通过右指针连接在一起(补上right指针)
- 从最高层级的头索引节点开始,向右遍历,找到目标索引节点的位置;
- 如果当前层有目标索引,则把目标索引插入到这个位置,并把目标索引前一个索引向下移一个层级;
- 如果当前层没有目标索引,则把目标索引位置前一个索引向下移一个层级;
- 同样地,再向右遍历,寻找新的层级中目标索引的位置,回到第(2)步;
- 依次循环找到所有层级目标索引的位置并把它们插入到横向的索引链表中;
总结起来,一共就是三大步:
- 插入目标节点到数据节点链表中;
- 建立竖直的down链表;
- 建立横向的right链表;
图解:
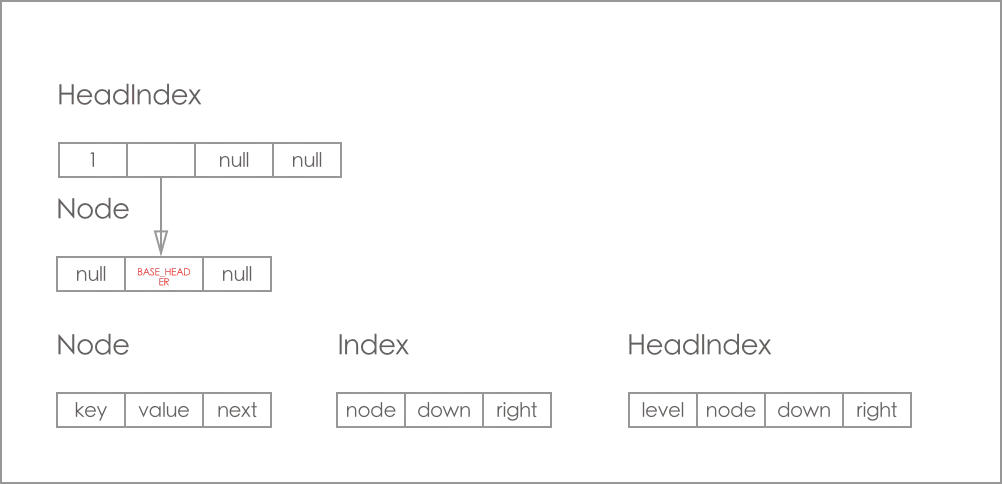
初始时, 只存在 HeadIndex 和 Base_Header 节点
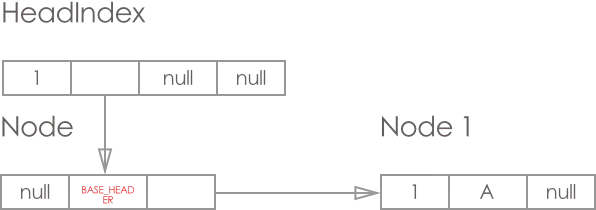
添加 key=1, value = A 节点, 结果如图:
再添加一个节点2
再次添加 key=3, value = C 节点
这时再put节点 key=4 value = D (情形和 Node1, Node2 一样), 最终结果:
再次添加 key=5, value = E 节点, 结果如图: